If you spend any time in the forums, you’ll notice that Neutral Density filters are a frequent topic of discussion.
Knowing why you need them and how to use them properly can dramatically improve the cinematic quality of your aerial video.
I’m not going to go in the technical side of ND filters in this article (we already wrote about that here). Instead this article is just designed to help you pick out the right set of ND filters, because they come in all shapes, sizes and prices.
Basic ND filter sets for the Mavic Air are easy to find at DJI, B&H Photo, Adorama and others.
DJI has it’s own stock set of ND filters, and 3rd party makers like Freewell, PolarPro and others have all brought products to market.

Using the Mavic Air as an example, to get the most cinematic video you would want to set you ISO manually to 100, which is the highest quality ISO setting.
We’ll film in 4K at 30 frames per second, so the rule of 2 tells us we want to set the shutter speed to 60, meaning 1/60th of a second.
But if it’s a super bright day, or your filming over highly reflective scenery like water, beach or snow there’s going to be too much light entering your camera and your footage will look washed out.
Enter the ND Filter for Mavic Air.
But how do you know which one to use? Easy.
Eventually you’ll get to know from experience which filter is right for given conditions. But until then, set your camera to Auto and have a quick look from the air what at you’re filming. Look at the camera settings and see what shutter speed the camera is using.
As an example, If it’s 1/2000th that means its so bright that the camera is increasing shutter speed to limit how much light there is in each exposed frame. But a speed that high is going to be incredibly grainy in your final video product.
So here’s the simple way to do figure out which filter you need. Divide the shutter speed above (2000) by the manual shutter speed (60) that you want. 2000 / 60 = 33. So we should use the ND32 filter, because it’s closest to the 33 answer.
There are also apps that will work this out for you. PolarPro has a really easy to use app for iOS and Android to work the numbers out for you.
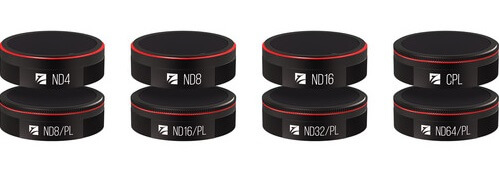
I use this example above, and the 32ND filter answer for a reason: it’s going to be fairly common in bright, sunny landscapes that the auto speed of your camera will be 1/2000th or higher depending on what you’re filming. So a basic 3 filter set that contains ND4/8/16 is basically going to be useless.
For the Mavic Air we purchased the Freewell All-Day 8 Pack of ND Filters for the Mavic Air ($129, B&H Photo, Amazon). It has a full range of filters (ND4/8/8PL/16/16PL/32PL/64PL/CPL) to cover just about every filming condition. All in one comprehensive kit.
The Freewell set isn’t cheap but like it’s name says, it’s all day ready for filming.
DJI sells a basic ND Filter Kit for the Mavic Air ($59 at store.dji.com) but we advise you pass on it. With ND 4/8/16 only, you’ll quickly discover just how often you actually need the higher density filters.
Or you could just cheat, and buy individual 8, 16, 32 and 64 ND Filters and call it a day. There $19.99 each at B&H Photo, and they are the most likely ones that you’ll ever need.
Once you realize how vital ND filters are to a truly cinematic video, make sure you buy the most complete set you can afford. You’ll end up with less need for time spent processing poor quality videos, and the slow motion segments of your films with be buttery smooth.